
PS如何扩大建立的选区
发布时间:2017-04-06 09:21
当大家用PS给图片建立选区时,如果建立的选区比较小没事,我们还能扩大选区。那么大家知道PS如何扩大建立的选区吗?下面是小编整理的PS如何扩大建立的选区的方法,希望能帮到大家!
PS扩大建立的选区的方法
按下快捷键Ctrl+0,打开一张图片。

使用选择工具创建选区,如下图:

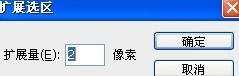
执行 选择>修改>扩展 命令。
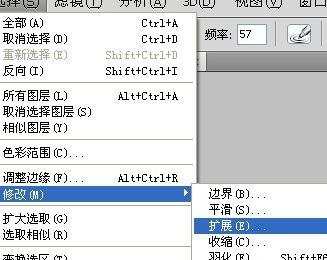
弹出 扩展选区对话框,设置扩展置为2像素,完成后单击确定按钮,此时,选区在原基础上扩大了,将灯泡的部分柔光效果添加到了选区中。
设置前景色为白色.按下快捷键Alt+Delete填充选区.制作出带有矢量效果的灯泡图像。

PS如何扩大建立的选区的评论条评论