
PPT2013教程怎样使用合并形状功能
发布时间:2017-06-13 19:13
相关话题
虽然ppt为我们提供了大量的形状图形,但是有时我们需要的图形它并没有直接提供,那么,我们需要在ppt中通过合并形状来制作出我们需要的图形,下面就让小编告诉你PPT2013合并形状功能的使用方法,欢迎大家来到学习。
PPT2013合并形状功能的使用方法
选中要合并的几个图形,点绘图工具下的格式菜单——合并形状——选择一种合并选项。
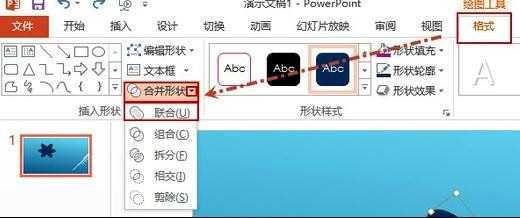
联合:即把两个形状合并为一个;

组合:除去图形相交的部分;

拆分:沿路径拆分图形;

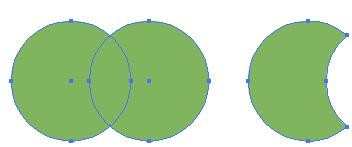
相交:保留相交部分;

剪除:前层图形对象剪去后层图形对象。
猜你感兴趣:
1.ppt2013怎么合并形状
2.ppt2013如何合并形状
3.PPT2013中怎么查找合并形状工具
4.ppt2013怎么用形状剪除功能图文教程
PPT2013教程怎样使用合并形状功能的评论条评论