
Win7怎么设置路由器并连接无线网络
发布时间:2017-02-28 17:37
相关话题
无线网络目前越来越多的人在使用,因为方便快捷,不用网线,手机、平板上网都很方便,下面是小编给大家整理的一些有关Win7设置路由器并连接无线网络的方法,希望对大家有帮助!
Win7设置路由器并连接无线网络的方法
1、首先进入桌面,点击“开始”按钮

2、接着点击“控制面板”

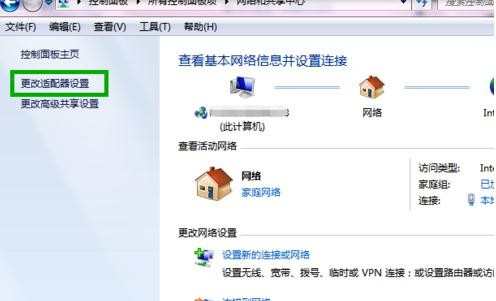
3、在控制面板界面,找到“网络和共享中心”

4、在网络和共享中心界面,点击左上角的“更改适配器设置”
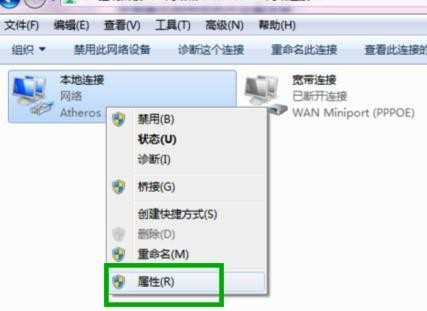
5、鼠标右键“本地连接”图标,弹出对话框选择“属性”
下一步选择“Internet 协议版本 4 (TCP/IPv4)”,并点击“属性”按钮

在对话框中,选择“使用下面的IP地址”和“使用下面的DNS服务器地址”
IP地址:192.168.1.2到192.168.1.255之间的任何一个地址都可以
子网掩码:255.255.255.0
默认网关:192.168.1.1
DNS服务器:192.168.1.1

接下来,打开IE浏览器在地址栏输入192.168.1.1进入路由器设置界面

进行WLAN参数配置,勾选“使用无线”功能,由于路由器不同,设置界面也不同,不过设置基本上都是一样的
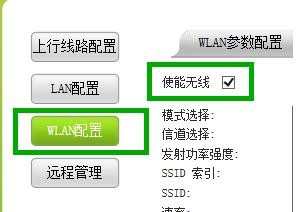
如图所示,填写完整,“SSID”可以更改你的路由器名称,“WPA预认证共享密钥”设置你的路由器密码,设置完成记得保存。

然后,“开启DHCP服务”

打开你的笔记本电脑,进入“设置新的连接或网络”

选择“手动连接到无线网络”

输入刚才你的路由器设置界面填写的信息

最后设置就全部完成了,你可以尽情享受无线网络带来的便利了。

Win7怎么设置路由器并连接无线网络的评论条评论